
I acknowledge the Traditional Custodians of Bullongin country on which I live and work. I recognize their continuing connection to place: to the land, the water and culture. I pay our respects to our Elders past, present and emerging. Sovereignty has never been ceded. It always was and always will be, Aboriginal land.

Hello, my name is Norton and my business is called Retritus. I am a queer, First Nations sustainable fibre artist and workshop facilitator. My main focus is natural dyes but I love everything to do with fibre arts and was drawn to fibre initially after hearing Jane Milburn talk about microplastics in our clothing and stayed after developing an interest in historical textile practice.
Weaving for me is all about texture and creating a sense of comfort. Like everyone I hoard yarn but I also spin using a wheel and drop spindle, I love to spin in the grease to create some really wild but homely textures. I really like to include pieces that feel sentimental in my weavings, like handmade wooden buttons or small pieces of pottery.
I was so excited when Rainie asked me to be part of this project and knew immediately that I wanted to share some simple and beginner friendly ways to naturally dye yarn for weaving. These instructions work best for wool but if you’re wanting to use cotton you will get lighter results. Make sure you have scoured or washed your yarn before dyeing to guarantee good dye uptake.
The first and easiest way to naturally dye yarn is by solar dyeing!

Here in the image you can see wool and flax yarn in a glass jar layered with onion skin topped up with a eucalyptus dye bath from a previous pot (you can use fresh water to get you started). To start your own solar jar, start with a clean glass that has been thoroughly washed and lay your botanicals in the bottom, then with your damp skein, place an end in the bottom of your jar, next add some more botanicals and continue - it should look like a concertina fold of yarn and dyestuff. Fill with water, close the lid and place in a sunny spot for 10 days. Easy botanicals you can put in your solar jar are onion skins, eucalyptus leaves, avocado skin (well cleaned), flowers. If you’d like to mordant your yarn beforehand feel free to do so - otherwise use botanicals that are high in tannin to get a good lasting colour. If you have a few days where it’s not as sunny you can always heat your jar in a bath of hot water to get it going.
The next way is to create a dye bath and extract colour from leaves, for this dyepot I have chosen oak leaves. Caution: never use the same pot or utensils or dyeing and cooking, always keep them separate and please heat in a well ventilated space preferably outside.
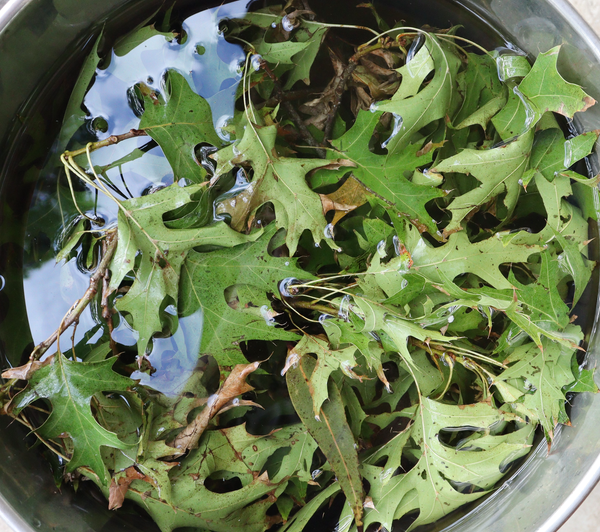
To begin, gather enough leaves to fill your pot (this will give you good saturation) and fill it with water. Again, if you haven’t mordanted your yarn, aim for leaves that are high in tannin for your first experiments - eucalyptus, oak, maple, liquidambar, fruit trees. Turn the heat on and bring it to a boil, then drop it down to a good simmer for the next hour. If you’re using eucalyptus, aim for 2-3 hours (they need a longer processing time to extract the dyes), then turn the heat off and let it cool. Once the dye bath is cool you can remove your leaves and place your pre wet yarn in to the pot. Bring your pot back up to a simmer for an hour and make sure you don't agitate the yarn (otherwise it will felt). After an hour, turn the heat off. If you are happy with the colour, you are free to take the yarn out and hang to dry, otherwise let it sit in the dye pot for a deeper saturation of colour.
The last technique I’d like to share is a really fun way to create speckled or variegated yarn. If you have had some experience with natural dyes before and have mordants on hand you can get really creative here!

For this skein I have used a combination of red and yellow onion skins, rose petals, eucalyptus, safflower and quandong leaves as well as copper and iron mordants. First I layered a bed of botanicals on some material so both sides will get equal amount of dyestuff, then placed my skein on top. I made sure I laid my skein quite flat so it made an even layer on the botanicals. I then used some leaves to dip in my copper and iron mordants to drizzle the liquids over the yarn so I will have some active modifiers to create a variegated tonal effect. Add another layer of botanicals on top of your skein and roll it up in the material, tie firmly. You don’t want to tie too tightly otherwise you can flatten your yarn but you want it firm so there is even pressure between yarn and dyestuff. You can either place this in a steamer or dye pot and cook for 90 minutes (again if you have eucalyptus in your bundle aim for around 2 hours).
This is a really fun technique that you can play with - either mordanting half your skein in alum and the other in iron, bind sections as a resist or leave an end of your yarn parcel open and submerge in a dye pot so you get some dye make its way in to your bundle.

When weaving this piece I didn’t use too many fancy techniques just rya knots, a little bit of soumack and pile. I used a linen thread for the warp and all yarns are handspun in their natural colours or naturally dyed. One tip I do have is if you want to attach a button to your work the way I have found works best is to find where you want to attach it, weave up to that point and pass your needle through the button holes like you are sewing it to a garment then continue your weaving, once you get back to the button make a stitch or two from behind on the lower row to fasten good and tight. If the button is big, you are going to have a hard time beating down the weft around it so simply turn your frame around and do it from the back!
I am really blessed to live on the Coomera river so I get my drift wood from the back yard and dry it out in the oven at 90-100 degrees for 2-4 hours and let it sit in the sun for a day afterwards, turning occasionally.

Thank you so much for being here, if you’d like to follow my work I can be found across facebook and instagram as Retritus or through my website retritus.com
The hand woven wall hanging made for this blog post is available to purchase here
- Norton
